


Sheds and Storage
Preparing a Concrete Base |
||
 |
Use pegs and string to mark out the area for the base. Measure between opposite corners to ensure the area is square. These will be equal if the base is square. |
|
 |
Dig out the ground in the marked area to around 175mm [7''] deep and remove pegs and string lines. |
|
|
MOT Type 1 Stone |
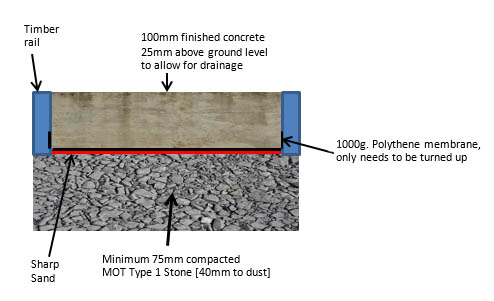
In the excavated area, lay a minimum thickness layer of 75mm compacted MOT type 1 stone [crushed stone 40mm to dust] or similar underneath the 100mm concrete layer.
Most builders' merchants will supply the MOT type 1 stone in 1 tonne bags. |
|
|
|
||
 |
Spread the layer of MOT stone, and compact using either a manual earth rammer or the powered wacker plates. |
|
 |
Petrol driven wacker plates which compact the stone by vibration, for the larger garden building bases. |
|
 |
Measure, cut and fit 100mm [4''] timber rails to the base. Check the formwork is level. |
|
 |
Cover MOT type 1 stone with a generous amount of sand [concreting or sharp sand]. Then cover with a layer of polythene damp-proof membrane 1000g [available from a builders' merchant] to prevent moisture rising through the concrete to the shed. The sharp sand fills any voids which could cause sinking and is used as a protection so the stones do not pierce the polythene sheet. |
|
|
Usage guide 150ml to 25kg cement mixed in water before adding sand and cement |
Mix concrete using 1 part cement to 5 parts ballast [sand and gravel] with a cement additive - WONKEE DONKEE recommends a mortar plasticiser. Adding plasticiser uses less water and provides a smoother, easier to work, shrink-free mix that when dry remains flexible and is more resistant to the effects of frost. |
|
 |
|
|
 |
WONKEE DONKEE advises against using washing-up liquid in the concrete mix. Some builders think it is alright to use, but it is not. It creates air bubbles, producing weaker, less durable concrete, and in winter the water would get in. The water freezes over and in time cracking would appear. |
|
 |
Some washing-up liquids also contain soluble salts, and this can lead to efflorescence [as water is driven out of the concrete in curing, salts come to the surface, as water evaporates it leaves the salt behind which forms a white, flossy deposit] which makes your work look unsightly. |
|
 |
WONKEE DONKEE says the only place for the washing-up liquid is on the kitchen sink! |
|
 |
Spread the concrete evenly and slightly proud of the timber rails. This can then be levelled off with a straight-edge timber resting on the rails, using a sawing motion. |
|
 |
WONKEE DONKEE recommends that once the surface has been smoothed over, use a soft bristle brush, lightly brushing across the base. This will leave a non-slip surface. |
|
 |
Leave the concrete for a minimum of 3 days to cure [hardening process].
When completely cured, remove timber rails and backfill the space with 'P' gravel [available in 25kg bags from a builders' merchant]. This will help to drain away moisture from the concrete base. |
|
 |
If wet weather is forecast, cover your finished base with polythene for 24 hours. In warm weather, cover with hessian sacking [available from a builders' merchant] keeping damp over the 24 hour period to prevent the concrete drying out too quickly, possibly resulting in shrinking and cracking. |


