


Sheds and Storage
Preparing a Retaining Wall
 |
 |
Retaining wall foundation depth should be 300mm if the soil is firm and well-drained, or 450mm if less firm and unstable. |
||||||||||||||||
 |
Dig out foundation [base on which wall stands] which must be twice the width of the wall. WONKEE DONKEE says to use a 215mm Hollow Concrete Block with a 450mm width foundation. |
||||||||||||||||
 |
Insert metal reinforcing bar, peg into trench at one end so the top of the peg is at a depth to take minimum 150mm [6"] concrete. Insert further pegs along the trench.
Use a spirit level to check tops of reinforcing pegs are level. |
||||||||||||||||
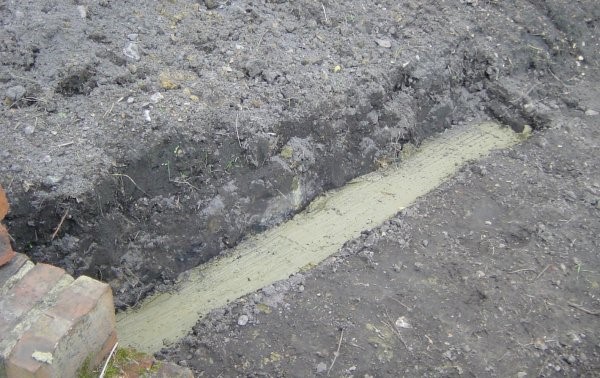 |
Once trench pegged, fill it in with concrete - 1 part cement, 6 parts ballast [sand and gravel] to the top of the pegs. Lay this in one session as itwill add to the concrete strength. Leave for a minimum of 48 hours to cure [harden] before building the retaining wall. |
||||||||||||||||
 |
WONKEE DONKEE strongly recommends using a mortar plasticisier, it uses less water and provides a smoother, easy to work, shrink-free mix. When dry it remains flexible and more resistant to frost. Sand and cement alone would not work, it would be too crumbly.
Washing-up liquid is not ok to use in the concrete mix, it produces weaker and less durable concrete. It creates air bubbles and in the winter water would get in, freeze and in time cracking would appear. Some washing up liquids contain soluble salts and can lead to efflorescence. In time this would leave a white flossy deposit which is difficult to get rid of and makes the work look unsightly. |
||||||||||||||||
 |
Using a 215mm Hollow Concrete Block, the retaining wall height should be no more than 5 bricks high as a single wall. Any wall higher would need structural support. |
||||||||||||||||
 |
Lay first course of concrete blocks, check levels and insert 12mm reinforcing bar, every other block, to the height of the wall. |
||||||||||||||||
 |
To fit a 12mm reinforcing bar, you need to drill a 14mm hole. |
||||||||||||||||
 |
Clean hole by brushing and blowing out.
|
||||||||||||||||
|
|
|||||||||||||||||
 |
Inject resin into hole until approx. 1/3 full. Release pressure on gun. |
||||||||||||||||
 |
Insert the reinforcing bar, twisting backwards and forwards, ensuring there is enough resin to overflow around the bar. Wipe off the excess resin.
|
||||||||||||||||
 |
Fill voids around 12mm bar with a wet concrete mix. Add any sizeable pieces of brick and concrete. This will help to strengthen the wall. |
||||||||||||||||
 |
12mm reinforcing bar available from your local builders' merchant, usually sold in 6m lengths. Some merchants will cut to length. |

 |
Lay the second course of blocks and add, if necessary, 18mm [3/4"] drainage pipes [weep holes] that will reach into the backfill gravel. This will drain the area immediately behind the blocks. This method can also produce unsightly staining to the face of the wall. The use of weep holes is not necessary if using perforated land drain. |
|
 |
After laying two courses, spread landscape fabric [provides a barrier between blocks and soil to protect and assist drainage] on soil at the base of the wall and over the soil slope. |
|
 |
Backfill with gravel, this offers good drainage and easy compaction. Lay perforated land drain. If rigid land drain, lay will holes to the bottom. If the land drain is flexible, there are perforations around the circumference, so any way up. |
|
Explaining the Importance of Drainage for a Retaining Wall |
||
|
What you need to account for in a retaining wall is hydrostatic pressure - the force of water, mainly on and in the ground that runs downhill. When a retaining wall is in the way, water pushes against it, and the wetter the ground becomes the more it pushes. |
||
 |
Reduce water penetrating into soil behind wall. |
|
 |
Without drainage, hydrostatic pressure will push the wall over. |
|
 |
With metal reinforcing bar in the retaining wall and perforated land drain, this can be prevented. |
|
 |
Rigid half-perforated pipes are laid with the holes to the bottom of the pipe. The hydrostatic pressure ensures that the pipe functions as a channel for groundwater. The downward pressure forces the water up through the drainage holes and into the pipe. At a period of high saturation the water will then flow out of the pipe to drain away naturally or to a drain outlet. |
|
 |
Nearly every retaining wall that has failed is due to an improper drainage system or the complete lack of one. |
|
 |
Build further courses of blocks to complete the retaining wall. Keep at it and don't lose your head! |
|
 |
Waterproof the wall to prevent water seeping in and damaging its structure. Use a waterproofer, e.g. Sikaprufe Damp Proof Membrane. Concrete should be primed with 1 part Sikaprufe to 6 parts water. Brush apply 2 coats, second coat at right angles to the first. When dry brush apply 3 coats Sikaprufe [allow to dry between coats]. |
|
 |
The remainder of the backfilling should not be carried out until the waterproofing protection is complete. When waterproofing fully dry, shovel more gravel over the perforated drainage pipe and fold the landscape fabric over the top. |
|
 |
Backfill remainder with soil and turf. |
|
 |
The completed concrete block retaining wall. |
|
